Thursday, March 7, 2013

The World at War Game Day at Ft. Meigs


The World at War Game Day is a fun little event that is held the first weekend in November at Fort Meigs in Perrysburg, Ohio. It is a one day mini-con with a strong family focus.  Rusty, Ted, and I from the Black River Area Wargames Society  ran "Looking for Bigfoot".   The Toledo Blade was there and took some photos of the event.  Here are a few shots we took of our game.

Players chased Bigfoot with a civilian figure of their choice.
We tried to make the terrain as diverse as possible
"Looking for Bigfoot" is the brain child of Ted who is a really big Bigfoot fan.  No, I mean he's really big and looks kinda "Squatchy" (sorry Teddi couldn't resist)! The rules were a collaborative process between those two, their children, and myself.  Initial game development took place on the car ride to and from Historicon.  I was taking notes and could barely keep up with all the flying ideas!   When we got back I worked the notes into the semblance of a game and we started play testing.

At one point we had 3 Bigfoots running around!
 The action was fast and furious as the players searched for, then chased Bigfoot all over the place!  According to the feedback we got, from kids and parents alike, I think we succeeded in our goal of making it a kid friendly, challenging, fun game.  Everyone had a great time including us!

Monday, March 4, 2013

Martians invade NOWSCON

I ran my Victorian Science Fiction game at NOWSCON back in September.  Northern Ohio Wargaming Society runs a small convention every year.  They are a diverse group of gamers who enjoy playing all sorts of games.  The scenario I ran, Aristotle Down, is the same one I have run before at other events.  It is a large battle based on John Carter of Mars. I use Black Hat's wonderful 18mm Martian Empires range along with some trusty Old Glory Brits! My friend and constant opponent, Rusty was there helping me run things and taking pictures.  It seems we are only ever on the same side if we are the ones running the game! It was an intense battle full of surprises, and everyone had a good time!


Carl Scheu, president of NOWS (far right), plots a devious move while I go over things with other players.


Things get deadly around the downed HMSS Aristotle!

The British end of the board empties out.

Carl's Green Martians overwhelm some Imperial Martin cavalry. In the meantime, his Calots had gone ahead and overrun the British supply column giving his faction a victory!


Old Glory Tour

Doing a little catch up from last year...

My friend Rusty, his son Cole and I got talking to Russ Dunaway of Old Glory as we were packing our cars to leave Cold Wars 2012.  He graciously invited us down to tour the Old Glory facilities and we, of course accepted!  Finally got it set it up and what a great trip for Miniature Wargamers it was!  Now be advised, if you ever make the trip, that the location can be a little um...challenging to find!  Let's just say that even with GPS we had some trouble!  But man, oh man was it ever worth it! Pulling up, we all felt like we had Golden Tickets! 
Your author getting his land legs after a twisting
drive through the hilly PA countryside.
Connie Dunaway, the "Real Boss" gave us a wonderful tour.
 When we walked inside we were greeted by Connie Dunaway who took us on our tour and explained every aspect of the operation.  I learned a lot about the casting process, and the business in general, that I did not know. The first thing we noticed were the molds lining the shelves throughout much of the shop.  Hundreds upon hundreds of them all systematically arranged so they could easily be pulled down to cast.  The actual casting area was much smaller than I expected.   Overall, the whole operation was smaller than you might expect.  The key to their success seems to be their highly efficient production process.  We were all impressed at just how quick their casting could be.  Rusty had hoped to get a look at a wagon he was thinking of buying, but they did not have one in stock.  Despite his protests, Connie insisted on having one cast for him to see. About 10 minutes or so later he had it in his hand!  Everyone in the shop was just as friendly and informative as they could  be, and the whole place had a real family feel. 


Rusty, Cole and myself in the packing area.
You can see a tiny fraction of the molds behind us.

The "Big Boss" (Russ) showed up after a we were there a while, and made sure to find out what Cole (14) was into (Zombies Vampires & Werewolves of course) and gave him a box of their very nice 28mm Blue Moon figures. We then discussed a variety of topics. Everything from the state of the  hobby, to the new location for Historicon, to what periods & rules we liked to play.  Russ was very interested in what each of us would like to see next in the way of figures, and our opinions were solicited about some current projects they are working on at the shop.  Cole and then Rusty eventually wandered off to shop. Both of them laughed as Russ and I continued our conversation.  It seems we both tend to get rather, shall we say, involved and passionate when discussing gaming!  Russ and I talked gaming until he had to leave, and he gave me an idea to try for some rules I'm working on.  Then I picked up a few "necessary items" (I started my pirate collection) and, with no small amount of regret, we were on our way home.
 
Kids in a candy shop!
Visitors who have shopped Old Glory at conventions will feel right at home.  They have all their traveling displays set up in the shop along with shelves and bins full of product. Now I am biased, since I have been a customer of Old Glory since they first started, but I was impressed with the whole operation.  Old Glory has a quality facility, making quality products at an exceptionally reasonable price.  I want to say thank you again, on behalf of Rusty, Cole and myself, to Connie, Russ and the whole gang at Old Glory for a most informative and enjoyable visit!

Monday, July 30, 2012

Sign of the times

Just something cool I found browsing the Interweb.
Enjoy!

Zulus at Historicon 2012

I have always wanted to run a game at Historicon. So, when my friend Rusty wanted to run his Myer's Drift scenario there and asked me to assist him, I said yes! The game ran Friday evening and we had a great bunch of gamers playing.  There were several no shows, but we still ended up having to turn away some who wanted to play.  Sorry guys, next time.
The main forces facing off across the Intombi River.


Our glorious GM "Sir Albert" surveys the pre game troop deployment.
The field of battle with assistant GM and one of our intrepid player.
 The scenario was based loosely on events along the Intombi River on 12 March, 1879.  For those not familiar with the situation the British, with wagons, were hit in camp at the ford, but some troops managed to get away and take cove at a local farm.  In this scenario they take cover at Myers station near the river, while the Zulus loot the camp. The British relief force arrives as the Zulus decide to attack rather than fall back as they did historically.  There was cover for the Zulus to sneak up on the Brits so there were some hidden units involved.  We were using the tried and true The Sword and the Flame rules, modified somewhat of course.
The opening moves...Both Zulu Horns attack.
Both sides were allowed to move all troops simultaneously for the first turn as opposed to the usual card based initiative. This had the players literally thinking on their feet for the first movement turn, and made sure the action started immediately. Both Zulu horns and the Zulu body rushed forward and the British relief force advanced.  The initial volley by the Brits was quite devastating, but the Zulu Impis persevered and actually returned some rather devastating fire on the Boers out on the British right flank.  After that we returned to the usual card initiative of TSATF.  Thanks to good initiative draws and high movement rolls by the Zulu they immediately closed the gap with their lead units to go after both flanks and the center almost simultaneously.
Impis swarm Myers station and advance on the British center.

Zulu luck continued and the British right flank began to crumble, due in part to some unfortunate rolls by the Boer commander.  The Brits coolly reformed as the Zulu abandoned their assault on the buildings and started coming for the infantry in the open.  The problem the Zulus faced was one of driving the Brits back too quickly which created a gap between the lines where British firepower quickly came into play.
The British reform and get ready for a fight!
There was a slight lull on the battlefield as the Brits re-dressed their lines, and the Zulu concentrated for the next big push.  The Zulu advance began to slow, and British marksmanship started to take its toll, but the Zulu commanders pushed forward despite their mounting losses.  


The Gatling gun never jammed once!
 The Naval Brigade and Gatling gun formed an important part of the line as victorious Zulus from the fight on the flanks caught up with their steadily advancing Body.  However, it began to look bad for the Zulu as British rifles did their work.  However, the Zulus again persevered and crashed into the British. They hit first on the British right flank, then on their left, all the while keeping the building occupied and threatening the center.  The hand to hand fighting became intense along the entire line as both sides hoped for victory.  Ultimately, the Zulus swarmed the British left, fought ferociously, and washed their spears in British blood! The result of this can be best seen in the photo below.

The British left is crushed!
By the time the British left failed, our time was about up so we had to call the game.  It was a Zulu victory, but the British still had some teeth left and might have pulled victory from what looked like certain defeat.  Still, the survivors were facing a rather large number of Zulu who had not been in action yet! 

In all, it was an intense, eventful, and extremely bloody affair!  At any given time it was uncertain who might win.  In fact, it turned into such a confused fight for survival that one British player did not realize the Zulu that charged him had been hidden. There were so many Zulu coming at him all he noticed was more enemies in his sights.  All our players were relatively new to the period, and the rules, but they enjoyed themselves immensely to a man! I have to say, Rusty and I had a great time too!  The credit for that goes to Rusty and his devious scenario planning, love for the period, and thorough play testing.
A grizzled survivor surveys the field.
Of course the (by now infamous) acoustics of the Fredericksburg Convention Center, and my penchant for talking, made sure I had lost my voice by the end of the night.  That said, it was a much roomier place to run a game than GMs usually get, and a more than adequate venue in my opinion.  I had a great time at Historicon, and I want to thank my friend Rusty for inviting me along and providing these photos.

Sunday, July 15, 2012

Ruins Project

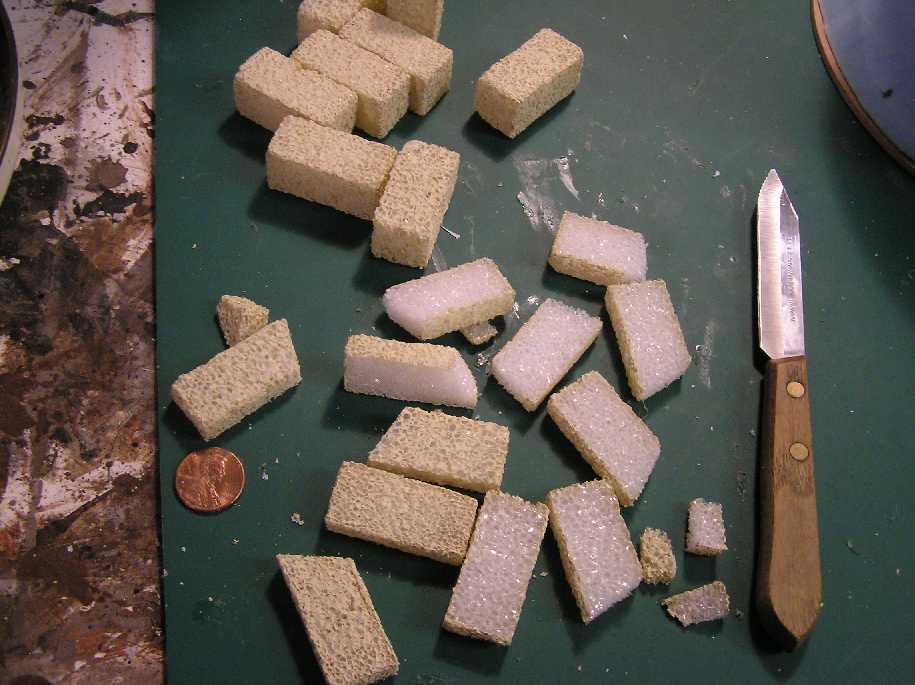
A while back I found this great building material at our FNCS (Friendly Neighborhood Craft Store) Pat Catan's.  These Styrofoam blocks are designed for school projects, dioramas etc., and they come primed to give them a rough, somewhat hard surface.
This is how they come. The rest is up to you!
If you can't find them locally, you can Google search "project bricks" for several places to order.


As you will see from this and other posts, I am NOT the world's best modeller, best painter, or handiest handyman!  I try to shoot for a sane mix of functionality, ease of construction, and a reasonably good looking, gaming friendly finished project...at least from 3 feet away.  These blocks suit my style of unplanned, impatient, no frills building.  They are extremely easy to cut, shape, glue, and they take paint nicely.  At first they can be a bit crumbly to cut/shape, but soon you will get the hang of how to work them to get some great effects.  Besides, you can always use any scraps for rubble piles!

I finally got around to playing, I mean working, with these blocks a while back.  I decided on some simple ruins that would fit with our Middle Earth campaign, but still be generic enough to use for other settings as well. In the end I made two similar pieces. The first one was just to test the waters of this new medium.  My son, seeing the first one nearing completion, got an idea for a slightly different ruin for his Middle Earth RPG scenario that was in preparation at the time.  Of course he wanted it for the express purpose of messing with us players (don't know where he gets these ideas since I have never messed with players when I'm GM)!

So, here I am, ready to go.  Got my Project Bricks and...
-a 1" thick piece of blue (or pink, or white) insulation foam about 9" in diameter
-a piece of 1/8" hardboard about the same diameter as the foam
-white glue (hot glue is also recommended on the box)
-a sharp knife or three, various sizes, emphasis on sharp, X-Acto for fine work
-toothpicks, round
-Medium to fine sand paper
-CelluClay brand instant papier mache (really handy stuff)
-Plaster of Paris
-large mixing bowl and spoon
-shaping devices: a kitchen knife or small putty knife (I use palette knives) and fingers
-acrylic craft paint
-ground scatter of choice

Get Mom's permission to use some of the above items especially if secured from the kitchen.  As a bachelor the kitchen is my realm anyway so I take what I want!  Besides, the items clean up easily if you do it right away.
First step: Make the base.
I wanted the ruins to be on a small rise so I started with the 1" blue foam and 1/8" hardboard.  I just roughed out the shape of the hill with my trusty knife, carved some crude stairs with an X-Acto, and glued them together.  You don't absolutely need the wood base, but I like the extra stability, durability and weight it adds to the finished product.  Any kind of thin wood would do, but I like the hardboard because it comes with a smooth and a rough side.  I put the rough side down and the piece grips my felt terrain cloth and will stay where it is placed.
While the glue dries on the base start working on the blocks.
The blocks are easy to cut and shape.
I cut some blocks in half lengthwise for the foundation and angled them a bit since I wanted a round structure. I  left an opening at the stairs and started to build the "walls".  The blocks are not completely standard in size, but you can fit them as you go which gives a nice effect for stonework and especially ruins. The neat thing is you can pinch, roll, crumble, and otherwise make misshapen lumps out of these things just using your fingers.  Perfect for ruins, old castles, and rubble!
The foundation is laid and the back wall started.
The blocks fit well with 28mm figures, but would be adequate for 20mm or even 15mm as well.
 Being ruins, block placement was not critical, and besides, as usual, I had no plans anyway! With some judicious matching and a little sanding you can get a much more finished look.  Toothpicks were used in the uprights, and in some of the more precarious pieces, for added stability, and game table survivability.  I used Aleene's fast dry tacky glue, but any white glue would do.  Hot glue will work on the blocks for those even less patient than I, just be careful gluing that first layer to the foam.  I use low temperature hot glue on foam occaisionally, but you cannot get the glue nozzle too close to the foam for too long. Plus it is not advisable if using a hot wire cutter after you glue.
Next step, the plaster mix!
I let the blocks dry at least overnight before continuing (24 hours would be best). Then my next step is to build up the hill a little.  I use a mixture of  about 2/3 CelluClay to 1/3 plaster. This gives a smooth, lightweight  paste that will be hardened by the plaster, but not too brittle.  You could use traditional papier mache, straight plaster, spackling compound, Durham's Water Putty, or even caulk instead (more on the wonders of silicone caulk in future posts).  You could also eliminate this step and go straight to flocking, but I have found that this mix adds durability to the foam, and allows you to adjust the hill's shape without any nasty fine cutting or sanding of the insulation foam.  This works especially well when using multiple scraps of foam to build up your terrain.  At this point, brown, green or gray paint (my three "primary" terrain colors) could be added to the mix, or even some white glue if you like.
Plaster mix added.
I smeared the plaster on with an artist's palette knife, of which I have various sizes.  The mix can be put on as thick, or thin, smooth or rough as you want.  Mine was on the thin side, but left fairly rough. If you want to get the this mixture really smooth it is easiest to use fingers dipped in a little water to smooth the surface.  At this point the walls could also be partially plastered for a more finished look. The more adventurous/artistic could even experiment with some fresco painting! After the mix has dried (about 24 hours) it is ready to be painted and flocked. 
Painted and ground cover added.
For this stage I used a slightly watered down mix of white glue and acrylic paint that I keep handy in old glue bottles.  I used medium gray with a black wash on the blocks, then a quick dry brush of light gray.  Then I liberally applied some of my brown and green glue mixes around, and in some cases right up on to the stones, and then applied my scatter.  let dry and you are done!  I usually go quite simple at this stage, but you could add static grass, weeds, flowers, or other such flora as available.  There could even be a tree growing out of one of the stones (next project)!
The bard Mavi checks out the ruins.
Not the greatest picture of the miniature, but the stone work is in better focus.  The coarseness of the blocks can be lessened with sanding, a light coat of plaster etc. if you prefer something smoother.  Of course, using my 3 foot rule, the roughness adds nicely to the impression from a distance.  You can see in this picture how the blocks were pinched and crushed to give that crumbled look.
Some ruins in winter.
The next piece used the exact same methods, except the plaster was spread on more liberally to create the snow effect.  It is not that clear in the photo, but some of the drifting effects came out quite nicely.  The precariously sagging doorway is braced with good old fashioned round toothpicks (a most indispensable item). 
There's that dang bard again.
These snowy ruins were built specifically for  my son Zack's scenario he ran for our group's Middle Earth campaign.  I thought we would explore these ruins on some frigid mountain top, but nooooo! One of our more reckless party members got teleported into a snow globe style trap and barely made it out alive (not me, but it could have been...whew)!  I plan on more of these structures, and even some more ambitious projects.  By the way, these two projects barely touched the box of Project Blocks!  According to the box it holds 285 blocks.  I figure I used maybe 40 altogether.

Saturday, July 14, 2012

The Steam Tank Project

Prussian improvised steam tank.
This is one of my latest WIP for the new Martian scenario.  My Prussians just did not have enough support vehicles so...  The chassis  is a Black Hat Martian Empires wheel kit for their steam tanks.  The super structure is card stock with some wood and  plastic bits added.  The gun is simply a Krupp field piece.  When it is finished I will get some better photos of the boiler side, and interior. Right now she needs a little more paint to be ready for action.  The plan is to use flags instead of hull markings so I can switch nationalities if I want.
Prussian steam tank with panzegrenadier option.
Here is the steam tank with troop carrying capabilities.  I was deliberately trying for as rough an appearance as possible (read poor modeling skills here), since this was all cobbled together on Mars far away from the European halls of industry!  The trailer wheel was cut from the core of a roll of receipt paper and the body  from card stock and various bits.  The rivets were an experiment with a seam marker from the sewing my basket (yes, I sew too). This is a handy device which has a handle and a small spiky wheel that I used to perforate some card stock in nice (somewhat) straight lines. Then I simply cut strips and glued in place. 

Sorry I don't have more photos yet.  I'm still getting used to this recording everything I do step by step thing.  My rather chaotic, completely unplanned, methods for this type of project are not really conducive to my recording them.  My engineer friend Rusty cannot believe I can make things like this without so much as a concept drawing.  I think it shows in the extremely rough, some might say crude, finished product.  My aim in this type of modeling is to get a reasonable representation of the object, for not much money or time consuming procedures, on to the game table.  I like to make terrain, models, and love to paint figures.  However, I also like to come up with scenarios, write rules, run games at Cons and our RPG campaign (Middle Earth...another whole topic), and just plain game...a lot!